Ultimate Facelock

Face Lift Surgery
- Natural looking and longest lasting results
- Restore youthful tightness and smooth skin
- Enhanced confidence
- Younger and more natural-looking face
1. What is a Facelift?
A facelift, or rhytidectomy, is one of the most popular facial rejuvenation procedures performed today. As many people know, facelift surgery can be performed in several different ways depending on the patient’s goals and the condition of their facial tissues. The surgeon evaluates each individual to determine the most appropriate technique, with the primary aim of restoring a more youthful, refreshed appearance by reducing wrinkles and correcting skin laxity that naturally occur with age.
At this point, many readers may be wondering: “How is my facelift technique different from others?”
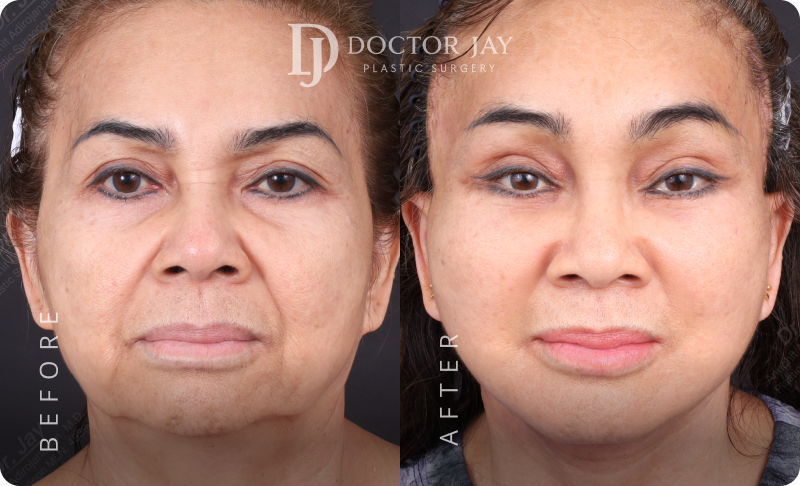
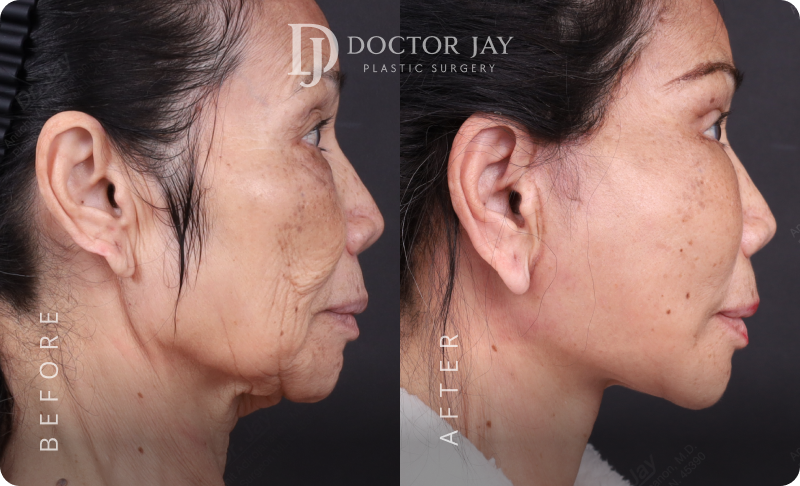
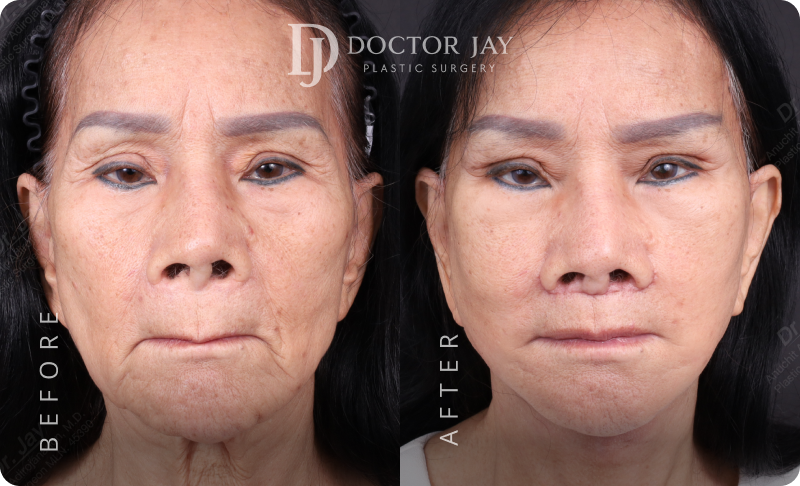
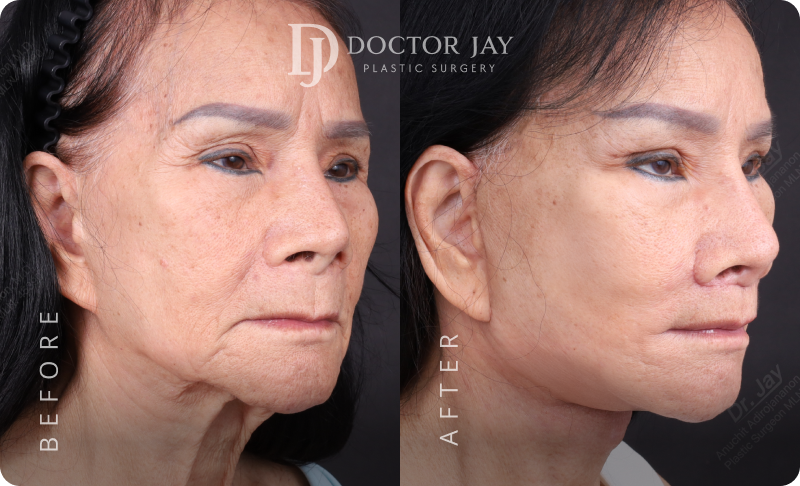
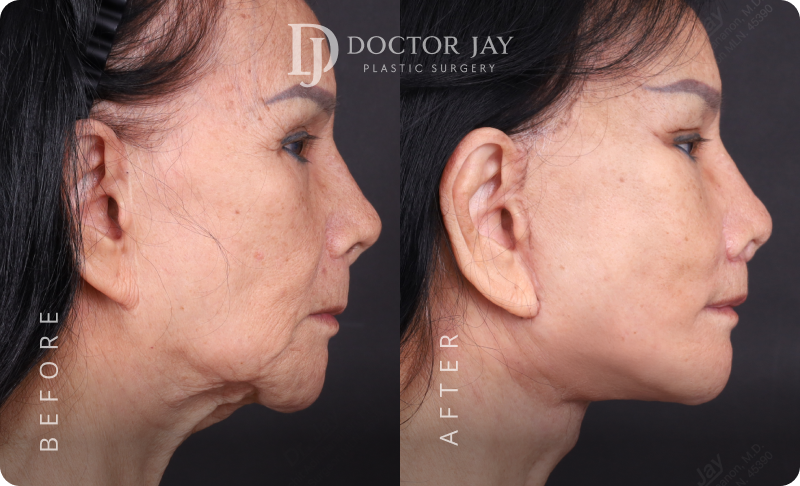
Before & After
Images
Procedures:
- Full Facelift
- V-Neck Lift (to address sagging neck and jowls)
- Lower Eyelid Correction with ligament Tightening, fat transposition, release tear trough ligaments , SOOF lift
- Endoscopic Brow Lift
Patient Profile:
- Female, 66 years old
- Concerns before surgery : Drooping outer eyes and brows, deep nasolabial folds and marionette lines, sagging jawline, loose neck skin, under-eye bags and wrinkles, tired facial expression
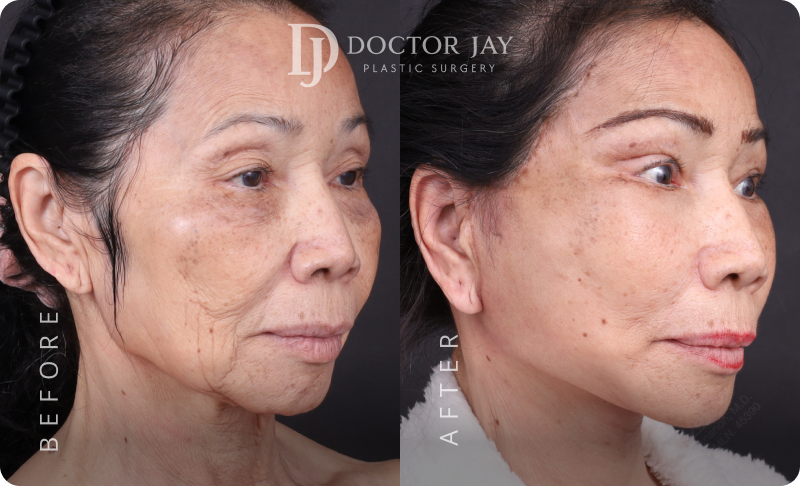
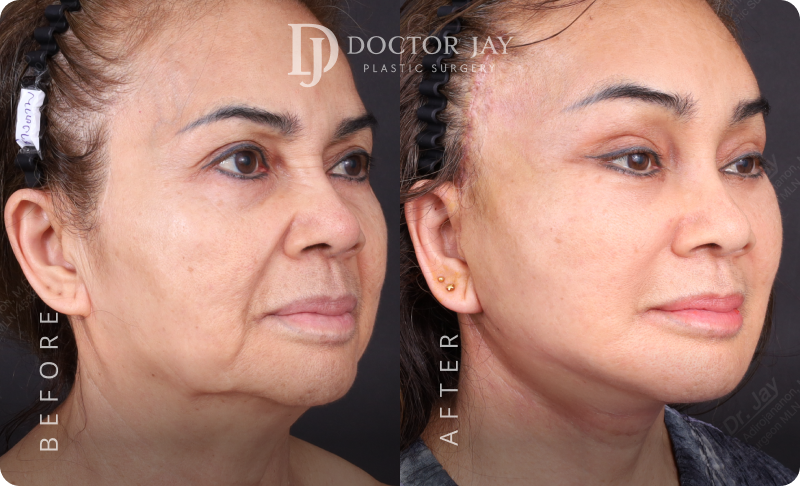
Procedures:
- Full Facelift with SMAS lift
- Lateral Neck Lift
- Ptosis Correction (Tired-looking eyes)
- Lower Eyelid Surgery with SOOF Lift and Ligament Tightening
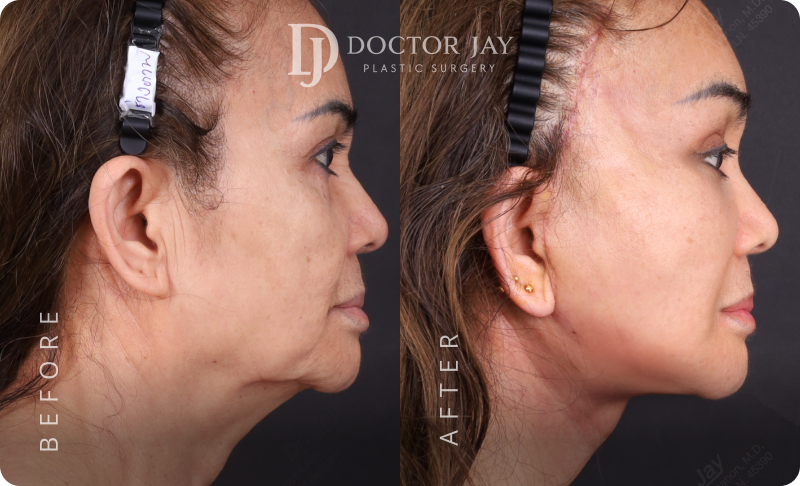
Procedures:
- Full Facelift with SMAS lift
- Lateral Neck Lift
- Ptosis Correction (Tired-looking eyes)
- Lower Eyelid Surgery with SOOF Lift and Ligament Tightening
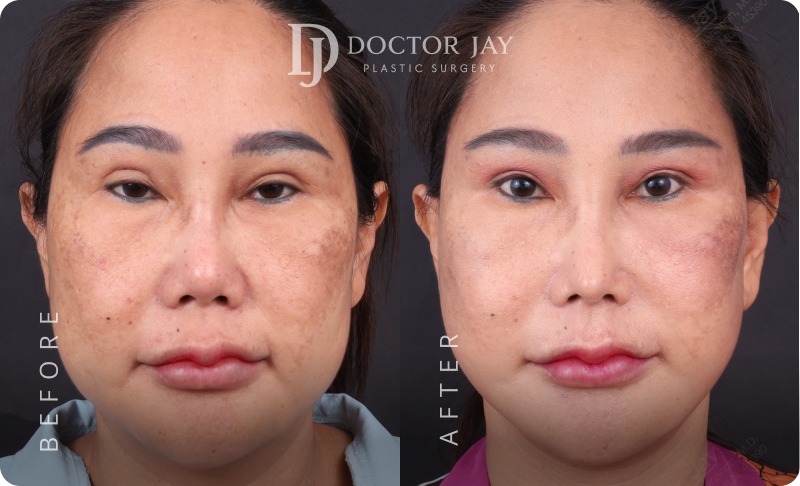
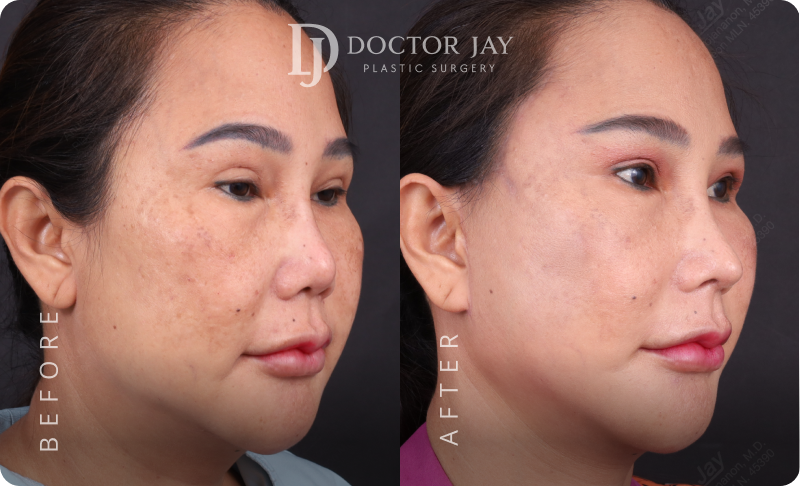

Procedures:
- Full Facelift
- Revision Upper Eyelid Surgery & Ptosis Correction
- Open-structure Rhinoplasty
Patient Profile:
- Female, 46 years old
- Concerns before surgery : High eyelid crease, droopy eyes, deep nasolabial folds and marionette lines, sagging cheeks, undefined jawline
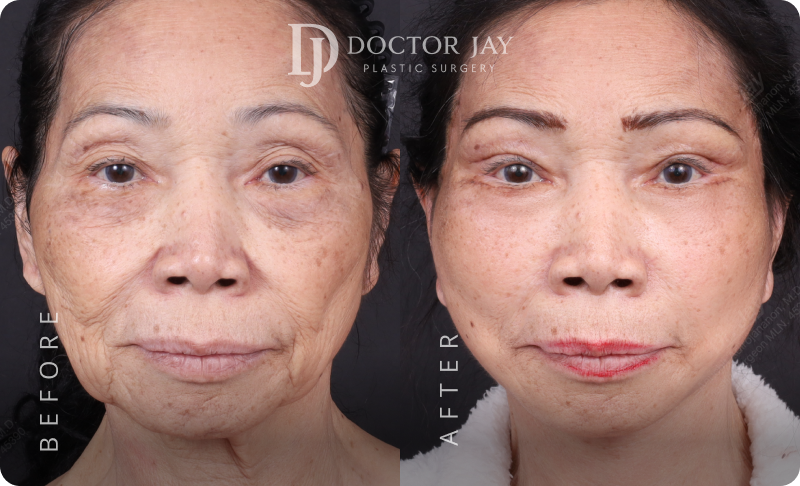
Procedures:
- Full Facelift
- V-Neck Lift (Anterior neck lift)
- Upper Lip Lift
Patient Profile:
- Female, 74 years old
- Concerns before surgery : Facial sagging, drooping outer eyelids, jowling, elongated and wrinkled upper lip, sagging neck (Turkey neck)
All photos are unedited and actual patients of Doctor Jay Plastic Surgery. The images are displayed with the consent of the patients. The outcomes shown are only relevant for these patients and do not necessarily reflect the results other patients may experience. Our team will discuss any factors that could influence the results that you may get.
Ultimate Facelock
The Ultimate Facelock technique is a specialised facelift approach that differs from traditional methods. This technique focuses on lifting down to the SMAS layer (Superficial Musculoaponeurotic System), allowing the surgeon to tighten the deeper structures and achieve a smoother, naturally lifted appearance without changing the patient’s inherent facial character. The goal is a refined, youthful result that respects each patient’s unique facial anatomy, following the principle: “No widened mouth, no pulled eyes, no unnatural look.”
For every case, I place great emphasis on meticulously hiding the incisions using a specialised scar-concealment method that is distinct from conventional facelifts. This results in a well-contoured, firm, and youthful-looking face from every angle, giving patients the confidence to fully embrace their rejuvenated appearance once again.

Deep Plane Lifting to the SMAS Layer
A key principle for achieving excellent facelift results is lifting down to the SMAS layer. This deeper approach allows all layers of the face to be tightened effectively, as facial sagging occurs not only at the skin level but also within the deeper muscular structures. If only the superficial skin layer is pulled and trimmed, the improvement is typically short-lived, with a high chance of recurrent sagging and more noticeable scarring. Lifting at the SMAS level provides more stable, natural, and long-lasting results.

The key to achieving effective facelift results
The most important factor in achieving a successful facelift is lifting down to the SMAS layer, which allows tightening of all the facial layers—not just the skin. Facial sagging occurs from the surface down to the deeper muscular structures, so lifting only the superficial skin layer provides results that are temporary, with a high chance of recurrent laxity. Skin-only tightening also increases the likelihood of visible scarring. Lifting at the SMAS level ensures more stable, natural, and long-lasting results.
2. Who Is Suitable for a Facelift?
Today, facelift surgery can be performed on people of any gender and across a wide range of ages. Candidacy depends on each individual’s specific concerns and personal goals. In recent years, there has been a noticeable trend toward younger patients—particularly those in midlife—seeking facelift treatment earlier than before. Based on my experience, patients can generally be grouped by age into two main categories.
Patient Group 1
Older Patients (50 years and above)
Common concerns include:
- Noticeable wrinkles and age-related skin laxity; they wish to reduce sagging and achieve a more youthful appearance.
- Loose, drooping skin that makes the face appear older than they really are.

Patient Group 2
Middle-Aged Patients (25–50 years)
Common concerns include:
- Wanting to rejuvenate the facial structure to improve overall appearance and confidence.
- Sagging or drooping cheeks caused by significant weight loss or previous facial contouring surgeries (such as cheekbone or jaw reductions).
- An undefined jawline or excess under-chin fat; wanting a slimmer, more contoured V-shaped face.
- Genetic predisposition to facial laxity, such as deep nasolabial folds or early neck sagging.
- Imbalanced distance between the eyebrows and eyes; facelift surgery can help reposition the brow–eye relationship for a brighter, more refreshed look.

3. Types of Facelift Surgery
The history of facelift surgery dates back to 1901, when German surgeon Eugen Hollander performed the earliest form of what we now call a traditional facelift. This classic technique involved creating an incision around the perimeter of the face, beginning at the hairline (either at the edge of the hair or within the hair-bearing scalp), extending down in front of the ear, curving around the earlobe, and continuing behind the ear. In some cases, the incision would also extend into the neck for patients who required significant tightening in that area. After opening the incision, the surgeon would lift and remove excess loose skin and tighten the underlying facial tissues to restore a more youthful appearance.
Over time, facelift surgery has evolved into many different techniques, each with its own advantages and limitations. Because the ideal method depends on the patient’s facial structure, skin condition, and individual goals, I always recommend consulting with an experienced surgeon to determine the approach that best suits each patient’s needs.
1. Skin-only facelift
(Subcutaneous facelift, Skin-only facelift)

- Results do not last long
- Mouth may appear widened, eyes may look pulled or unnatural
- Scars may be more noticeable and wider
2. SMAS or deep-layer facelift
(Deep plane facelift)

- Results last 5–10 years
- The face appears naturally lifted in a
way that suits your own features - Scars heal more smoothly and discreetly
We can see that performing a skin-only facelift is relatively simple and carries fewer risks, which is why it is often performed by general practitioners or surgeons who are still early in their training for this type of procedure. In contrast, lifting deeper to the SMAS layer (Superficial Musculoaponeurotic System) requires extensive experience, specialised expertise, and a thorough understanding of the facial nerve anatomy.
Although deep-plane or SMAS facelifts are more complex, they provide significantly more natural and longer-lasting results. On the other hand, skin-only facelifts often require revision within 1–2 years, and many patients feel that the results do not last as long as they had hoped.
At this point, many readers may be wondering: “How is my facelift technique different from others?”
1.Skin-Only Facelift
(Subcutaneous Facelift)
In this technique, the surgeon makes an incision along the hairline, extending down in front of the ear and sometimes around to the area behind the ear. The dissection is carried out beneath the skin and fatty layer until reaching the targeted areas—such as the nasolabial folds or marionette lines. The excess loose skin is then trimmed, and the wound is closed immediately.
This method has certain advantages: it can often be performed without general anesthesia, the surgical time is relatively short because the deeper muscle layer is not lifted, and the recovery period tends to be quicker. Many patients are able to resume normal daily activities shortly after the procedure.
2.SMAS or Deep-Layer Facelift
(Deep Plane Facelift)
Lifting the SMAS layer—the muscular layer beneath the skin—has been a core facelift technique for decades. Once the skin is elevated, the surgeon encounters the SMAS layer underneath. There are various ways to manage and reposition this layer, and although different techniques exist, current research has not shown one specific SMAS method to be universally superior.
For clarity, I typically categorize SMAS manipulation into two main approaches.

2.1 SMAS Plication SMAS Tightening
(SMAS Plication, MACS Lift)
In this technique, the surgeon tightens the SMAS layer by suturing it together—either by folding, gathering, or widely plicating the SMAS until reaching the desired vectors of lift. The sutures are then secured to create tightening and support of the deep tissue layer.
Advantages
- Does not involve dissecting beneath the SMAS, so the deeper facial nerves are not at risk.
- Provides effective tightening of the muscular layer.
- Produces longer-lasting results compared to skin-only facelifts.
Limitations
- Plicating the SMAS often brings the overlying fat layer together as well, which may make the face appear fuller—particularly in patients with round faces or fuller cheeks. This is most noticeable around the cheekbone area.
- Cannot release the facial retaining ligaments, as the dissection does not extend deep enough beneath the SMAS layer.
- May result in earlier recurrence of sagging compared with the deep plane technique, which will be discussed in the next section.


2.2 Sub-SMAS Lift
(Deep Plane Facelift, Dual Plane Facelift)
This technique is considered the most advanced and technically demanding because the surgeon must dissect beneath the SMAS layer to release the retaining ligaments. These ligaments are responsible for anchoring the facial tissues, and proper release is essential for achieving long-lasting results. However, this deeper plane also contains several branches of the facial nerve, which requires precise anatomical knowledge and surgical expertise. If the retaining ligaments are not adequately released, the lifted tissues may settle quickly and the results will not be long-lasting, as illustrated in the diagram below.
Advantages of the Deep-Plane / Sub-SMAS Facelift
- Direct release of retaining ligaments between the muscle and the bone allows the surgeon to correct facial sagging at its true structural source. This provides a much more effective and targeted improvement than techniques that tighten only the superficial skin layer.
- Ability to remove excess fat located above the muscle layer, making this method ideal for patients with round faces or fuller cheeks—groups that often do not see strong results from more superficial facelifts.
- Produces a slimmer, more refined, and naturally contoured facial shape, with longer-lasting and more harmonious results.
Considerations and Safety Notes
- Because the dissection is performed beneath the SMAS, there is a potential risk of temporary facial nerve weakness. However, with proper surgical expertise, this risk is extremely low.
- From my own experience, the incidence of temporary nerve injury is only 0.2%, and no cases have resulted in permanent damage. Any temporary symptoms typically resolve within 2–3 months.
- Additional details on managing postoperative complications will be explained in the following section.
Summary and Final Advice
- Facelift surgery offers several different techniques, each with its own strengths and limitations.
- Approaches that produce the most long-lasting results are generally more complex, but when performed by a certified, experienced specialist, the risks become very minimal.
- Because a facelift is a major procedure and not something done frequently in life, careful research and thoughtful decision-making are essential.
- Choosing a surgeon with the right knowledge, experience, and ethical standards dramatically increases the likelihood of achieving excellent, long-lasting results.

Simply pulling the skin layer or simply suturing the muscle layer will not release the retaining ligaments, which are like tree branches. Therefore, there will be a recoil force, causing the face to sag again more quickly.

The SMAS sub-muscle lift involves releasing retaining ligaments to reduce the pulling force, thus potentially making the results of the facelift last longer than other methods.
4.Treatment Areas
In the past, facelifts were commonly performed as a full-face lift. Today, however, facelifts can be performed in separate regions depending on each patient’s concerns and desired outcome, helping reduce swelling and shorten recovery time. To make this easier for patients to understand, I divide the face into six main zones:
1. Endotine Forehead Lift
(Lifts the upper forehead, brows, and glabella area)
2. Upper Face Lift
(Lifts the upper cheeks, lower eyelids, and lateral brow area)
3. Midface Lift
(Lifts the mid-cheek region, tear troughs, and malar area)
4. Lower Face Lift
(Lifts the lower cheeks, jowls, and jawline)
5. Neck Lift
(Tightens the lateral neck and improves skin laxity)
6. V-Neck Lift (Anterior Neck Lift / Submental Lift)
(Targets central neck laxity, platysmal bands, submental fat, and double chin concerns)

1. Forehead
The forehead lift is suitable for patients with prominent forehead wrinkles that remain visible even without raising or frowning the eyebrows, as well as those with low or drooping brows that create a stern or tired expression.
2. Upper face – Temple area
This zone includes the outer corner of the eyes, tail of the eyebrows, and crow’s-feet. It is ideal for patients with lateral hooding of the upper eyelid or drooping of the eyebrow tail, which often makes the eyes look sad or tired. In some cases, this lift is marketed as the “Foxy Eye” lift, which essentially refers to an upper-face or temporal lift. When performed properly, it elevates the outer brow and eye corner to create a more refreshed look while softening crow’s-feet. However, over-lifting can cause the eyes to appear pulled or unnatural, so balance is key.
3. Midface – Cheeks and nasolabial folds
This includes the cheeks and nasolabial folds. It is suitable for patients with deep laugh lines, mid-cheek sagging, or volume descent. This zone requires meticulous lifting and fat repositioning to avoid creating overly prominent cheekbones or hollowing. For patients with very deep folds, I often release the fibrous bands in the nasolabial area and combine the lift with fat grafting for optimal results.
4. Lower face – Mouth corners, nasolabial folds, and jawline.
This includes the mouth corners, marionette lines, and jawline. It is suitable for patients with deep marionette creases, downturned mouth corners, and early signs of jowling. Aging leads to laxity of the skin and weakening of facial ligaments, causing the fat pads to descend and obscure the jawline. Lifting this zone can be challenging due to the proximity of the facial nerve branch responsible for controlling the lower lip. If not approached carefully, temporary—or in rare cases permanent—nerve weakness can occur.
5. Lateral neck – Facial frame, wrinkles on the side of the neck
This includes the jawline and the skin along the sides of the neck. It is ideal for patients with neck wrinkles, prominent neck bands, or early jowling. A lateral neck lift is often performed together with an anterior neck lift to address deep neck creases, laxity, and fullness under the chin. Incisions typically extend behind the ear and into the hairline. When performed well, this lift sharpens the jawline—especially at the mandibular angle—creating beautiful contours from every angle.
6. Anterior neck – V-neck lift
This includes the area under the chin and the central neck, where the platysma muscle often separates into two vertical bands. The V-Neck Lift is a specialized technique I developed to address sagging, wrinkling, and fullness in the central neck. It is suitable for several patient types:
- Younger patients with congenital platysmal separation and early double chin
- Patients who develop neck laxity after rapid weight loss
- Older patients with thinning skin, increased fat protrusion, and progressive muscle laxity
- Some may also have enlarged salivary glands contributing to fullness
Because anterior neck aging has many possible causes, accurate diagnosis and an individualized surgical plan are essential.
Primary treatment steps may include:
- Liposuction of the jawline and under-chin area
- Deep fat removal
- Reduction of enlarged salivary glands
- Deep platysma muscle tightening
- Superficial platysma tightening
- J-plasma (Renuvion) for additional skin contraction
5.Facelock Procedure
8 Steps to the Ultimate Facelock Facelift
Step 1:
Comprehensive Assessment &
3D Surgical Planning

I begin by assessing the patient’s degree of facial laxity through a detailed physical examination. In some cases, I also create a 3D simulation using the clinic’s imaging system, allowing the patient to visualise the expected outcome before surgery. This helps ensure clear communication and shared understanding between doctor and patient.
Step 2:
Pre-Operative Marking & Vector Planning

Next, I mark the patient’s face to identify areas of sagging, determine the vectors of lift, and plan the incision lines.
Step 3:
Anesthesia, Hemostasis Control
& Surgical Access

Once the anesthesiologist administers general anesthesia, I inject local anesthetic into the surgical field to reduce bleeding during the procedure. I then begin opening the skin and fat layers. Throughout the surgery, I communicate closely with the anesthesiologist, particularly to maintain stable blood pressure, which helps minimise blood loss and ensures optimal patient safety.
Step 2:
SMAS Elevation &
Deep Plane Lift

The next step is lifting the SMAS, or deep muscular layer, which is essential for achieving the most natural and long-lasting results. Working at this depth requires substantial surgical experience and precision, as important facial nerves lie just beneath the SMAS. If the surgeon is unfamiliar with the nerve pathways, there is a risk of temporary – or even permanent – facial weakness.
Step 5:
Skin Redraping, Excision
& Fat Recontouring

After lifting the SMAS layer, I remove any excess skin and fat, then reposition and redistribute the facial fat to achieve more balanced and harmonious contours.
Step 6:
Hemostasis & Drain
Placement if Needed

In some patients, if there is more bleeding than expected, I place a small drainage tube behind the ear, which is removed within 24–48 hours. If bleeding is minimal, a drain is usually not necessary.
Step 7:
Multi-Layer
Wound Closure

I then begin closing the incisions layer by layer – typically three layers in total. This step often takes about 1–2 hours, as meticulous closure is essential to achieve the most refined scar and ensure it remains as discreet as possible.
Step 6:
Hemostasis & Drain
Placement if Needed

Once the wound is fully closed, the medical team and assistants wash the patient’s hair to remove any blood residue, as the patient will be unable to wash their hair for the first 5–7 days. A facial compression bandage is applied to reduce swelling, and after 24 hours, the wound is checked and the patient is transitioned into a proper compression garment.
6.Incision Placement
Incision design is one of the most important aspects of facelift surgery.
A well-placed incision allows the scar to be concealed effectively, helping patients feel more confident after surgery.
There are two main goals when designing facelift incisions:
1. To access and correct the deeper facial layers
This includes working on the SMAS layer, either by:
- SMAS plication — tightening the SMAS by suturing it together, or
- Deep plane facelift — releasing beneath the SMAS layer and lifting it as a single unit.
2. To reposition the skin and remove excess tissue
This allows the overlying skin to be redraped smoothly for a firmer, more youthful appearance.
Facelift incisions typically involve three key locations:
- The temporal (temple) region
- In front of the ear (preauricular area)
- Behind the ear (postauricular area)
Incision in the Temple Area
The purpose of this incision is to lift the upper face, particularly:
- The temple region
- Crow’s feet
- Lateral canthal area (outer corner of the eye)
- And in some cases, part of the midface such as early cheek descent or nasolabial fold prominence
Surgeons generally have two choices for temple incision placement.
The decision is based on several factors, especially the distance between the hairline and the lateral orbital rim (outer edge of the eye socket).
If this distance is more than 4–5 cm, a hairline-adjacent incision (in front of the hairline) is preferred.
If the incision is placed within the hair-bearing scalp in these patients, the lifted skin can cause the hairline to shift backward, making the forehead appear longer and widening the distance even further.
Incision Along the Front Hairline
Commonly used in: Anterior neck lift / V-neck lift, cases with neck muscle laxity or under-chin heaviness.
Advantages
- Allows for stronger skin tightening, as the incision is closer to the area being lifted.
- Lower risk of traction alopecia, because the pulling vector is not applied directly from within the hair-bearing scalp.
Disadvantages
- May cause hairline thinning if the hair follicles near the incision are damaged.
- The frontal hairline scar can be more visible than an incision placed within the hair.

Incision Within the Hairline
Advantages
- The incision can be better concealed within the hair-bearing scalp.
Disadvantages
- Provides less skin tightening compared to a front-hairline incision.
- Higher risk of temporary or permanent hair loss along the incision if hair follicles are injured.

Incisions in Front of the Ear (Preauricular Incisions)
Incisions in this area are primarily designed to address midface and lower-face laxity—issues such as prominent nasolabial folds, cheek descent, and loss of jawline definition.
In the front of the ear, the incision may be placed either:
- In front of the tragal cartilage (pretragal)
- Along the contour of the tragus (tragal incision)
Before choosing a tragal incision, the surgeon must examine the skin thickness over the tragus compared with the facial skin.
If the difference is too great, pulling thicker cheek skin over the tragus may make the tragus appear blunted or deformed because the skin becomes too thick to show the natural contour of the cartilage.
Pretragal Incision (In front of the tragus)
Commonly used in: Anterior neck lift / V-neck lift, cases with neck muscle laxity or under-chin heaviness.
Advantages
- Lower risk of skin necrosis or delayed wound healing compared to tragal incisions.
- For men, this approach avoids pulling beard hair onto the tragus, preventing hair growth on the ear cartilage.
Disadvantages
- The scar may be more visible than a tragal incision because it lies at the skin–cartilage junction rather than being hidden along the contour.

Tragal Incision (Along the tragus edge)
Advantages
- The scar can be beautifully concealed along the tragal border, making it very discreet.
- When performed correctly, thinning the flap over the tragus helps recreate the natural tragal contour.
Disadvantages
- Because the skin over the tragus must be thinned significantly, there is a higher risk of slower wound healing or compromised blood supply compared to a pretragal incision.

Surgeon's Recommendation
In my experience, especially for international patients who have limited recovery time, I often recommend the pretragal incision.
Most people naturally have a crease in front of the ear, and once healed (around 6–12 months), the scar usually blends into this crease.
Additionally, this technique carries a very low risk of wound-healing complications.
Because of this, patients tend to worry less about their scars and can return to normal life more quickly.
Incision Behind the Ear

The postauricular incision is designed to provide access for lifting the lower face and neck. The incision typically curves around the earlobe, as shown in the illustration, and then continues into the natural crease behind the ear. From there, it follows the groove upward to the point where the ear is widest, before turning back into the hairline behind the ear.
This placement allows the scar to be very well hidden—even when the patient wears their hair up—because it lies within the natural shadows and folds behind the ear.
7. Pre-Operative Instructions
1. Undergo a full medical evaluation and disclose all underlying conditions.
This is crucial because uncontrolled medical conditions can significantly increase surgical risks.
For example, poorly controlled high blood pressure may cause excessive bleeding during surgery, making the procedure more difficult and prolonged. It can also lead to postoperative bleeding, resulting in more swelling, bruising, and delayed facial contouring.
2. Stop smoking at least 1 month before surgery.
Research shows that smokers have up to 12 times higher risk of delayed wound healing.
This may lead to poor scarring or, in severe cases, wound infection and skin necrosis.
3. Avoid alcohol for 1–2 weeks before surgery.
Alcohol can increase bleeding during surgery and worsen postoperative swelling and bruising.
4. Discontinue medications and supplements that affect blood clotting for 2–4 weeks.
This includes:
- Aspirin and other antiplatelet medications
- Fish oil
- Vitamin E
- Collagen supplements
These substances can increase bleeding risk during and after surgery.
5. For patients receiving general anesthesia, refrain from food and water for at least 8 hours before surgery
Failure to fast can result in aspiration when the anesthesiologist intubates you, posing a serious health risk.
6. Wear loose, comfortable clothing. Avoid contact lenses, false eyelashes, makeup, and nail polish.
Nail polish can interfere with the oxygen saturation monitor placed on your fingertip.
False eyelashes and contact lenses may complicate anesthesia or sterilization procedures.
7. Wash your hair before surgery and avoid hair products
Do not use hairspray, gel, or conditioner, as they make it difficult to secure the hair during surgical preparation.
8. Avoid Botox or filler injections for 3–6 months before surgery.
These can alter facial dynamics and interfere with the surgeon’s assessment.
9. Avoid thread lifting procedures for 3–6 months before surgery.
Threads can distort facial anatomy and create scar tissue, making facelift surgery more difficult and potentially compromising results.
8. Post-Operative Care
1. Apply cold compresses during the first 7 days.
This helps reduce swelling and bruising. Cold temperature causes the blood vessels to constrict, which minimizes bleeding and inflammation in the early stage.
2. Sleep with your head elevated at a 45–90° angle for at least the first 3 days.
Use 2 pillows or a wedge pillow. This prevents excessive blood flow to the head, which can worsen swelling.
3. Avoid sleeping on your side for 1 month.
Side-sleeping can place uneven pressure on one side of the face, potentially affecting symmetry during the healing process.
4. Avoid activities that may impact or place pressure on the surgical area during the first month.
Trauma or excessive movement may disrupt the sutures in the deeper layers or affect wound healing.
5. Avoid direct sunlight, heat exposure, and standing close to hot stoves for 1 month.
These can increase swelling and redness. Additionally, UV exposure within the first 3–6 months increases the risk of post-inflammatory hyperpigmentation, causing the scar to darken.
6. Monitor for abnormal symptoms.
Observe for:
- Increasing swelling
- Firm or painful lumps (possible hematoma)
- Redness or warmth around the incision
- Seek medical attention if symptoms worsen.
7. Clean the incision twice daily.
Use sterile normal saline to gently remove dried blood or debris, then apply an antibiotic ointment such as Terramycin. Usually recommended twice a day.
8. Avoid smoking, alcohol, fermented foods, seafood, and inflammatory foods for at least 1 month.
These can increase swelling, impair healing, or raise infection risk.
9. Avoid getting the surgical area wet for at least 7 days or until sutures are removed.
Moisture may increase the risk of wound separation or infection.
10. Wear the compression garment exactly as instructed.
- Wear 24 hours a day during the first 7 days (remove only for showering).
- Continue wearing at least 12 hours per day or while sleeping for a full 1 month.
- After 1 month, begin RF tightening treatments to help reorganize collagen and improve skin texture.
11. Start using scar-reduction products after 1 month.
This helps prevent raised or thickened scars.
12. Attend all scheduled follow-up appointments.
Typical follow-up timeline: 1 week, 2 weeks, 1 month, 3 months, 6 months, 1 year, and 2 years.
9. Risks and Complications of Facelift Surgery
Complications following facelift surgery (rhytidectomy) can be significant, particularly because most facelift patients are older and often have underlying medical conditions.
For this reason, I always prioritise a thorough evaluation of each patient’s overall health, as it directly affects surgical safety. Since facelift surgery is elective and non-urgent, preventing complications is absolutely essential.
Proper patient selection, detailed anatomical knowledge, meticulous surgical technique, and attentive postoperative care all play vital roles in reducing complications. The most common complications include:
1. Hematoma (Blood Accumulation)
This is the most common complication after facelift surgery.
Global research shows an incidence of 1.8–2%.
A large hematoma is considered a surgical emergency.
If not treated promptly, the pressure from the accumulated blood can compromise blood flow to the skin, leading to skin necrosis or infection.
This occurs because the blood clot compresses the small vessels that supply the skin flap around the incision.
Risk Factors for Hematoma
- Systolic blood pressure > 150 mmHg (Increases risk by 3.6×)
- Male gender (Increases risk by 2.8×)
- Aspirin or NSAID use (Increases risk by 2.0×)
- Smoking (Increases risk by 2.0×)
- BMI > 25 (in some studies)
These risk factors must be identified and controlled. Failure to do so increases the likelihood of complications.
Additional Factors Surgeons Must Manage

During surgery:
- Close communication with the anaesthesiologist to maintain stable, non-elevated blood pressure
- Medications to minimise bleeding
- Placement of surgical drains when multiple areas are lifted to prevent blood accumulation
After surgery:
- Adequate pain control and anti-anxiety medications
- Medications to reduce nausea and vomiting
Management
- Small hematomas: compression dressings and observation (though it may take time to resolve).
- Large hematomas: require immediate surgical evacuation in the operating room.

2. Skin Necrosis (Skin Loss)
Minor skin necrosis occurs in about 3–4% of patients.
While hematoma is a common cause, other contributing factors include:
Major Causes
- Smoking. Smokers have 12.46× higher risk due to chronic blood vessel constriction and reduced skin perfusion. Patients must stop smoking at least 4 weeks before surgery.
- Surgical technique.
Examples:
- Excessive skin tension (common in skin-only facelifts)
- Overly wide skin flap undermining
- These reduce blood supply and increase necrosis risk.
Treatment
- Proper wound care by an experienced plastic surgeon
- Close monitoring
- Hyperbaric oxygen therapy, which research and clinical experience show to significantly accelerate healing and limit tissue loss
Most cases heal on their own within 2–4 weeks, depending on patient factors (underlying health, genetics) and postoperative care.
3. Infection
Infection rates in facelift surgery are very low—only 0.18% (based on 6,166 global cases).
This is because facelift surgery typically does not involve placing foreign materials into the body.
Surgeons routinely administer:
- Intravenous antibiotics preoperatively, and
- Oral antibiotics postoperatively
Important Consideration: Diabetes
Poorly controlled diabetes (HbA1c > 7) significantly increases the risk of:
- Delayed wound healing
- Postoperative infection
Prevention
Patients should:
- Avoid high-risk foods (fermented foods, seafood, spicy foods) for 1 month
- Practice proper wound care (cleaning and antibiotic ointment)
- Avoid water exposure until sutures or medical staples are removed


4. Nerve Injury
The face has sensory nerves and motor nerves.
Temporary numbness is very common after facelift surgery because some sensory nerves are disrupted during skin undermining.
This usually improves over 3–6 months.
Motor nerves control facial movement and include 5 major branches. The two most vulnerable are:
- Temporal branch — helps raise the eyebrows
- Marginal mandibular branch — helps lower the corner of the mouth
These branches are more prone to visible dysfunction because each has no secondary crossover innervation.
Symptoms
- Inability to raise eyebrow → temporal branch injury
- Asymmetric smile or inability to show lower teeth → marginal mandibular branch injury
Incidence & Causes
Nerve injury occurs in 3–4% of cases.
Common causes include:
- Traction or stretching during surgery
- Heat injury from electrocautery
- Liposuction of the jawline/neck area
Prevention
Meticulous surgical technique and thorough anatomical knowledge significantly reduce the risk.
Treatment
- Vitamin B complex (B1, B6, B12) for nerve recovery
- Electrical stimulation therapy (ES) for more severe cases
- Magnetic stimulation exists but evidence is limited and cost is high
5. Pixie Ear Deformity
This deformity occurs when excessive tension pulls the earlobe downward, making it look elongated or attached.
Causes
- Improper incision placement
- Excessive skin tension, especially when the deeper layers (SMAS) are not adequately tightened and only the skin is pulled
Treatment
Corrective surgery is possible but usually done 4–6 months after initial healing.


6. Deep Vein Thrombosis (DVT) & Pulmonary Embolism (PE)
Deep vein thrombosis (DVT) and pulmonary embolism (PE) are rare complications following facelift surgery, with reported rates of only 0.35% for DVT and 0.14% for PE. Despite their low incidence, they are potentially serious and require careful preoperative screening. Patients with risk factors such as a family history of blood clots, cancer, advanced age, prior clotting disorders, or those undergoing major operations are evaluated using standard risk-assessment scoring systems to determine their likelihood of developing these complications.
For prevention, most low-risk patients need only pneumatic compression devices during anesthesia to support healthy blood flow. In higher-risk individuals, prophylactic anticoagulant injections may be considered, but these must be used cautiously because they can increase bleeding during surgery. Careful selection and appropriate preventive measures help minimise the risk of these rare but significant complications.

Reclaim your youthful face. Reclaim your self-assurance.
Meet Dr. Jay
Dr. Anuchit Adirojananon (Dr. Jay)
Dr. Jay is a board-certified plastic and reconstructive surgeon specializing in natural-looking facial rejuvenation surgery. With over 6 years of dedicated experience in facial surgery, he has earned his M.D. from the prestigious Mahidol University and holds board certification from the Royal College of Surgeons of Thailand. Dr. Jay’s commitment to excellence has led him to train with world-renowned facelift surgeons across Korea, the United States, and Europe, constantly refining his techniques through participation in ISAPS conferences, New York Masterclasses, and international cadaver labs.

Why Choose Us

Art Meets Science
Philosophy
Dr. Jay’s unique approach fuses artistic vision with scientific precision, preserving your authentic self whilst creating natural improvements tailored to your individual needs.
Advanced 3D Treatment
Planning
Personalised treatment plans using cutting-edge 3D imaging technology consider facial harmony, individual anatomy, patient goals, and long-term aesthetic outcomes for optimal results.
Deep Plane Facelift
Mastery
Specialist in advanced deep plane technique targeting muscle layers, not just skin. Delivers longer-lasting, natural-looking results without the “pulled” appearance of traditional methods.
Patient-Centred Listening
Approach
Dr. Jay prioritises genuine understanding by asking patients to identify their top three concerns, then creates tailored treatment solutions addressing specific issues safely.
VIP International
Patient Care
Comprehensive boutique hospital experience including VIP recovery rooms, 24-hour nursing care, English-speaking team, video consultations, and thorough aftercare planning for international patients.
Media-Recognised
Expertise
Trusted expert featured in Hello Magazine Thailand and GMM25’s programme. Regular media contributor discussing facelift surgery trends and aesthetic innovations in Thailand.
Begin Your Journey to
Renewed Confidence
Take the first step towards your transformation by booking a consultation today. During your personalised consultation, Dr. Jay will discuss your goals, explain advanced techniques, and create a customised treatment plan just for you. Your journey to renewed confidence starts here.